
Home Improvement

Get home improvement ideas, renovation tips, and financing insights to increase your home’s value and enhance your living space.

Fall Tree Care: October Is for Planting and Looking, Not Cutting

Fall Tree Care: October Is for Planting and Looking, Not Cutting 150 150 Creative Studio

Key takeaways

  • Fall is the worst season for routine pruning, because a pruning cut is an injury and a tree heading into winter is not growing the tissue it uses to close one.
  • Fall is the best season for planting in Georgia, because the soil stays warm enough to support root growth through much of the winter.
  • The tree job that does belong to October is a slow walk around the yard, since the weeks when leaves are coming down are the only time you can see the shape of a tree clearly.
  • Homeowners insurance covers a tree that hits your house or another insured building, and generally does not cover hauling away one that falls in the yard and hits nothing.
  • Roughly three-quarters of Atlanta’s tree cover stands on single-family residential land, so most of this city’s trees are private property and somebody’s responsibility.

A client called me in October last year about a tree. Not a mortgage question, a tree question. A big water oak had come down across his driveway during a storm, and he wanted to know whether there was a smart way to pay for the removal, because his insurance company had told him something he did not expect and he was still absorbing it.

I get more of these calls than you might think. People call their loan officer when a number lands on them out of nowhere, and a mature tree failing next to a house is one of the larger numbers a homeowner meets without warning. That conversation sent me down a long road of reading about tree care, and what I found surprised me enough that I have been repeating it to clients ever since. Almost everything most of us do with our trees in the fall, we are doing in the wrong season.

The season everybody prunes is the season arborists tell you to wait

Autumn feels like the time to cut things back. The leaves come off, the yard looks unkempt, the weather is finally pleasant to work in, and tidying up seems like the responsible thing to do before winter arrives. It is one of the most common instincts in homeownership, and horticulturists spend a good part of every autumn talking people out of it.

The reason comes down to what a pruning cut actually is. Kansas State University’s extension service puts it plainly: pruning, although a recommended practice, creates an injury. The question is never whether to prune, it is when to prune so the tree can deal with the wound as quickly as possible. Fall is not that moment, because the plant is shutting down for the winter and is not focused on producing the new tissue that protects the cut. Late winter and early spring, when growth is fastest, is when the tree is best equipped to handle it.

There is a second reason, and it changed how I look at trees. Trees do not heal the way we do. When you cut yourself, the wound scabs, new skin grows in, and eventually the injury is gone. A tree cannot do that. Instead it seals, walling the damaged wood off behind a layer of cells and growing new wood over the top. Arborists call this compartmentalization. The damage is still in there permanently, covered over. If you cut into that trunk years later you can still see exactly where the old wound was.

Timing is what decides which of those two outcomes you get. A cut made when a tree can seal it quickly becomes a small sealed pocket. A cut made when the tree is shutting down for the year sits open longer, and if the tree cannot get ahead of it, that is where rot begins. Decay builds cavities, and cavities are what eventually cause a large limb or a whole trunk to fail years down the line, often in a storm, often over something expensive.

None of this means you should never touch a tree in autumn. Extension guidance is clear that removing dead, dying, broken or hazardous limbs can be done at any time of year, because the safety of people and property comes first. If a branch is hanging over your driveway right now, deal with it now. What should wait is the discretionary work: the shaping, the thinning, the general tidy-up that is about how the tree looks rather than whether it is dangerous.

Fall is the right time to plant, and Georgia’s soil is the reason

Planting is where the calendar turns around completely. The season that is wrong for cutting is the best one of the whole year for putting a tree in the ground, and in Georgia the advantage is bigger than it is in most of the country.

University of Georgia Extension has been making this case for years. Most people plant in spring, because spring is when garden centers are full and planting feels seasonal, but a tree planted in fall gets to build an extensive root system while the top of the plant is dormant and demanding nothing. Frank Watson, a UGA Extension coordinator, points out that soil temperature across most of the state stays warm enough to support root growth during most or all of the winter. The tree is not sitting idle for four months. It is building the thing it will need most.

The payoff arrives in July. A tree planted this October goes into next summer with roots already established and ready to pull water. A tree planted next April goes into the same summer with almost nothing underground, trying to keep a full canopy of leaves supplied during the hottest, driest stretch of a Georgia year. UGA’s position is that a correctly sited and planted fall tree will simply outperform a spring one, and the reason is that head start.

A few things matter if you plant this autumn. Check the trunk before you buy, because any damage to the bark is reason enough to leave that tree at the nursery. Look for a straight trunk and an even, balanced canopy, which will be easier to shape later and tends to be structurally sounder. Check the container for roots circling the inside, which is a sign the tree has been in the pot too long and will have a poor root system once it goes in the ground. Dig the hole two to three times the width of the root ball, set the tree at the same depth it was growing at, and leave the fertilizer until spring so the roots establish before you push new growth up top. New trees need extra water for their first two years, which is the step most people abandon somewhere in year one.

Think about placement as though the tree is already full grown, because one day it will be. The Insurance Information Institute, drawing on restoration specialists, suggests keeping large shade trees at least twelve feet from structures that roots could damage, and offers a general rule of not planting trees within twenty feet of the house. Roots rarely attack a foundation directly. What they do is shift and dry the soil underneath and around it, and unstable soil is what moves a foundation.

Most of Atlanta’s trees are standing in somebody’s yard

Bar chart showing that single-family residential land holds 76 percent of Atlanta's total tree canopy, ahead of multi-family residential land and other categories at 8 percent each, industrial land at 6 percent and commercial land at 2 percent

We talk about Atlanta’s tree cover as though it belongs to the city, and legally almost none of it does. Georgia Tech’s canopy analysis for the City of Atlanta found that single-family residential land accounts for about three-quarters of the city’s entire tree canopy. Parks hold around five percent. The rest is scattered across multi-family, industrial and commercial land.

Private ownership of those trees reframes the whole subject. When people say Atlanta is a city in a forest, the forest they are describing is mostly in back gardens, along driveways and over roofs, and it is maintained, or not maintained, by individual homeowners one property at a time. If a large tree near your house is in poor shape, there is no city department that is going to notice.

Atlanta’s tree cover has been thinning, too. The most recent assessment from Georgia Tech, released in August 2026, put the city’s tree cover at 45.7 percent of total land area in 2023, down from 46.5 percent five years earlier, and found the city has lost an average of close to 150 acres of urban forest a year since 2008. Most of that recent loss came from development rather than from individual homeowners cutting trees down. Still, it means the trees standing in private yards are carrying more of the load than they used to.

What to look at when you walk the yard

Walking the yard is the job that belongs to October, and it costs nothing but half an hour. Once the leaves start coming down, you can see the architecture of a tree for the first time since April: the branch structure, the dead wood hiding in the middle of the tree, the shape of the trunk. In July it is all hidden behind foliage.

Professional arborists use a structured process for this, and the categories they work through are useful even for an untrained eye. The International Society of Arboriculture’s basic risk assessment walks an assessor through the crown, the branches, the trunk, and the root collar and soil, and then asks the question that most homeowners skip entirely: what is underneath. That last question is the one that matters most. A leaning, hollow tree in the middle of an empty field is a tree. The same tree twenty feet from a bedroom is a problem.

Start by standing back far enough to see the whole tree at once, then work down. In the upper part of the tree, you are looking for dead branches, broken or hanging limbs still caught up there, and whether the leaves this year came in noticeably thinner or smaller than on similar trees nearby. Significant dead wood up top is a sign of a tree in decline, not just an untidy one.

On the branches themselves, look for places where two limbs of similar size join, especially where the bark looks pinched into the union rather than flowing around it. Those unions are weaker than they look and are a common failure point. Look for cracks, and for evidence that a branch has already broken off at some point, which tells you the tree has a habit.

On the trunk, the things to note are a lean, cracks running up and down the wood, missing or dead bark, and open cavities. Mushrooms or hard shelf-like growths on the trunk are the clearest signal of all, because those are the fruiting bodies of fungi that live on decaying wood and are considered definite indicators of decay inside. If you see them on the trunk or at the base of a tree near your house, that is the point to stop guessing and call somebody.

At the base, look at the soil. Cracked or heaved soil on one side of the trunk means the tree has been moving in the wind more than it should. Look for whether the flare at the bottom of the trunk is visible at all, or whether soil, mulch or a new patio has been piled up against it. Check whether anything has changed near the tree in the past few years, such as a trench for a utility line, a grade change, a new driveway, or the removal of neighboring trees that used to shelter this one from wind.

What insurance does, and what it does not

Insurance is the part that caught my client out, and it catches out most people. Almost everyone assumes a homeowners policy treats a fallen tree as a fallen tree, and it does not.

According to the Insurance Information Institute, if a tree hits your home or another insured structure such as a detached garage, a standard homeowners policy covers the damage to the structure and the contents inside it, including trees brought down by wind, hail, or the weight of ice or snow. It does not matter whose property the tree was growing on. If it lands on your house, you file with your own insurer.

If the tree hits an insured structure, the policy also contributes toward removing it, but that contribution is capped and it is not designed to cover the full cost of taking down and hauling away a mature hardwood. And if the tree falls without hitting a structure, there is generally no coverage for removal at all. A large oak lying across your back yard, having touched nothing, is typically yours to deal with, though some insurers make an exception when the tree is blocking a driveway or an accessibility ramp.

Maintenance matters too. The Institute notes that where a neighbor’s tree falls on your house, your insurer may pursue their insurer if negligence can be shown, such as a tree that was diseased or was not properly maintained. That runs both directions. A tree you knew was failing and did nothing about is a different conversation with an insurance company than a healthy tree taken down by a storm.

I am not an insurance agent and your policy is the only thing that actually governs your situation. The useful move is to look up your own tree and debris removal limits before you need them, rather than during the week you need them.

More tree cover is not automatically more value

One last thing about value, because it surprised me. Trees are good for a property’s value, but the relationship is not a straight line, and cutting a healthy tree down is not automatically a loss.

A US Forest Service meta-analysis pooled twenty-one separate studies of tree cover and home prices, and found that the value effect appears to peak at somewhere around thirty percent tree cover on the property itself. The authors also noted that the typical study property had only about fourteen percent cover, which suggests most American homeowners have fewer trees than the market would reward, not more.

So if you are weighing whether a particular tree earns its place, you are asking a fair question, and the answer is not always yes. A well-placed, healthy, well-shaped tree near the house is doing real work for the property. A struggling one leaning over the roof is not paying you anything, and it is the one that will eventually send somebody a bill.

Your fall walkaround

Print this, or just keep it on your phone. Give it half an hour on a Saturday once the leaves are properly coming down, and work through one tree at a time rather than trying to take in the whole yard at once.

  • ☐  Stand back far enough to see each large tree whole, and start with the ones closest to the house, the driveway and where people sit.
  • ☐  Note what is underneath each tree within a distance equal to its own height, because that is what it can reach if it fails.
  • ☐  Look for dead branches high in the tree, and anything broken or hanging that is still caught up there.
  • ☐  Check where two limbs of similar size meet, looking for bark pinched into the join rather than flowing around it.
  • ☐  Look up and down the trunk for cracks, missing or dead bark, and open cavities.
  • ☐  Look for mushrooms or hard shelf-like growths on the trunk or at the base, which are a sign of decay inside.
  • ☐  Check the soil at the base for cracking or heaving on one side, and make sure the flare at the bottom of the trunk is not buried.
  • ☐  Note any change near the tree in the last few years: trenching, a grade change, new paving, or neighboring trees removed.
  • ☐  Book a certified arborist for anything with mushrooms on it, a new lean, or a large limb over a room somebody sleeps in.
  • ☐  Save the discretionary pruning for late winter, and put anything you want to plant in the ground this autumn instead.

If the walk turns up something that is going to cost real money, I would rather you called me early than late. A tree is not a mortgage question, but how you cover a large unplanned bill often is, and the options are better before the work is booked than after the invoice arrives.
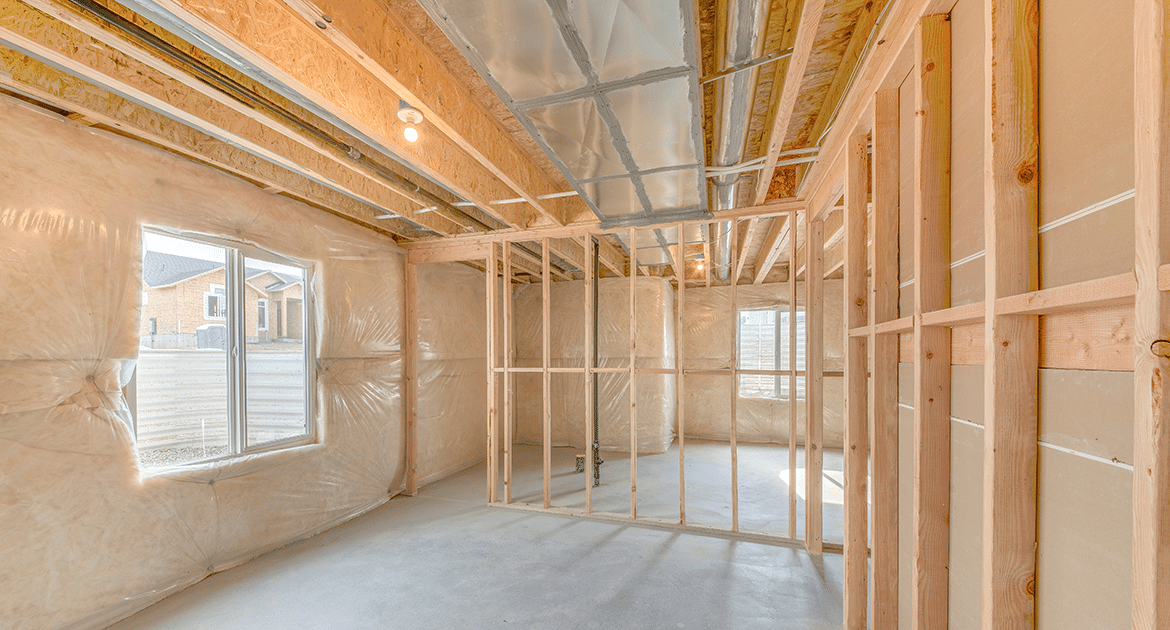

An unfinished basement framed with new wood studs and insulated walls, daylight coming through a window

The In-Law Suite Most People Price Wrong

The In-Law Suite Most People Price Wrong 1200 630 Creative Studio

Key takeaways

  • Converting space you already own is usually cheaper than building a separate unit in the backyard, and most homeowners price the backyard version first.
  • Atlanta currently allows only detached accessory units, which means basement apartments and garage conversions aren’t permitted in the city today.
  • The Atlanta Department of City Planning has proposed allowing attached conversions, but that change hasn’t been adopted and is still moving through review.
  • Accessory dwelling rules are written city by city and sometimes tightened further by an HOA, so the only answer that counts is the one from your own jurisdiction.
  • A cash-out refinance and a home equity line are the two routes I can help with directly, and which one fits depends on your situation and what you qualify for.

A client called me last month because her mother is moving down from Ohio. She’d been going back and forth about it for the better part of a year, and she’d landed where a lot of families land. She wanted her mom close by, but she didn’t want her mom living in the guest room off the hallway. Both of them wanted a door that closes and a kitchen that belongs to somebody. So, she’d gotten a quote on a small cottage for the backyard, and the number came back high enough that she called me half convinced the whole idea was finished.

I asked her one question before we talked about money at all, which was what she had above her garage. There was a full floor up there, unfinished, holding a Christmas tree and a treadmill nobody had touched in three years. She’d priced the most expensive version of what she wanted without ever looking at the cheaper one sitting over her own cars, and in my experience that’s how it usually goes.

The expensive version is the one people price first

The phrase the industry uses for a second living space on your property is accessory dwelling unit, which is a clumsy name for a simple thing: somewhere smaller to live, on the same lot as the main house. An in-law suite is one. So is a garage apartment, a finished basement with its own entrance, and the little cottage at the back of the lot that people’s grandparents called a granny flat.

When somebody pictures an accessory unit, they almost always picture the cottage. It’s the version that shows up in magazines and the version builders put on their websites, and it’s also the version that requires a foundation, a roof, new plumbing runs and a new electrical service. Every one of those is a line item that a conversion of existing space either skips entirely or handles far more cheaply.

Cities that have allowed accessory units for years show which version homeowners actually choose. The Atlanta Department of City Planning, comparing our rules to other cities, points out that in Los Angeles nearly four out of every five accessory units are conversions or expansions of space that already existed. Only one in five are detached buildings. Given a real choice between the two, most homeowners don’t build in the yard.

I’m not telling you the cottage is a bad idea. If your basement is four feet tall and your garage is falling down, the yard may be your only option. I’m telling you that most people never price the comparison, and the comparison is where the money is.

What people actually want the space for

People’s reasons for wanting an in-law suite are more mixed than the internet suggests. The pitch online is almost always rental income, and income is part of it for a lot of families. It’s rarely the whole story, and in my office it’s usually not the part that started the conversation. What starts it is a parent, or a kid who moved home, or a sister between houses.

When Freddie Mac asked homeowners in 2022 why they’d want one, the most common answer wasn’t income at all. It was having somewhere to put out-of-town visitors. Renting came next, and moving family in came after that. People could pick more than one reason, so the shares add up to well past 100, and plenty of them had a family reason and an income reason at the same time.

Bar chart of the top reasons people would consider an accessory dwelling unit, from a Freddie Mac consumer survey: hosting out-of-town visitors 37 percent, renting to tenants 33 percent, renting to vacationers 21 percent, moving family in permanently with rent 19 percent, moving family in temporarily without rent 18 percent

Two other surveys point the same way. AARP’s 2024 survey of adults found that one in four older homeowners say they would consider building an accessory unit to provide space for a loved one who needs care or a place to live. The Census Bureau counted 6.0 million American households in 2020 with three or more generations under one roof, up from 5.1 million a decade earlier, and that was 7.2 percent of all family households. Families are spreading across fewer addresses than they used to, and the house is where that gets absorbed.

What Atlanta allows right now

Atlanta’s rules need spelling out precisely, because the answer changes at almost every city limit. What follows is true inside the Atlanta city limits and nowhere else. If you’re in Marietta or Decatur or unincorporated Gwinnett, read it as an illustration of how much these rules vary rather than as your answer.

In Atlanta today, you can build a detached accessory unit without asking the city for special permission, as long as your property sits in one of the residential zones the code lists (R4, R4A and R5) plus a handful of special districts. That’s the city’s own description of its current code. The unit has to be its own building, separate from the house, and it can’t be split off and sold as its own lot.

Notice what’s missing from Atlanta’s current rules. Atlanta doesn’t currently allow the accessory unit to be attached to the main house. A basement apartment with its own entrance and an apartment carved out of an attached garage, the two cheapest versions of this, aren’t on the table inside the city right now. The city’s planning department says so plainly, and names it as the thing that makes Atlanta an outlier: limiting homeowners to detached units limits them to the more expensive option. So, if you live in the city and somebody has told you to just finish the basement and put a door on it, that advice is out of date, or it came from somewhere else.

What the city has proposed, and what that means for timing

The Department of City Planning has put forward a set of changes, and they go directly at that gap. The proposal would allow accessory units attached to the main dwelling, specifically naming a basement apartment or a garage conversion, capped at half the size of the main house or 1,000 square feet. It would raise the size limit on detached units from 750 to 1,000 square feet, raise the height limit from 20 to 24 feet so a unit over a garage becomes possible, extend the allowance to the R4B district, and stop counting garage space against the unit’s square footage.

None of those proposed changes is law yet. The proposal sits inside the city’s larger zoning rewrite and is still working through the review process, which means neighborhood review, a zoning board hearing and a City Council vote before anything changes. I’m not going to guess at the timing, and you should be suspicious of anyone who does.

The practical consequence for an Atlanta homeowner is that the calendar matters. If the conversion you want is attached, the answer today is no, and it may not be no forever.

What actually stops these projects

Every one of these projects runs into the same wall, and the wall is permission rather than money. Permission is what people check last, and it’s what they should be checking first.

Accessory dwelling rules are written city by city and county by county. Two houses four miles apart can sit under completely different rules, and an HOA can tighten things further on top of whatever the city allows, including banning a separate kitchen or a separate entrance outright. I can’t tell you what your jurisdiction permits, and neither can a contractor who works across three counties, and neither can a website. You have to ask your own planning department and read your own covenants.

The other thing that stops these projects is whether the space can actually work. A separate entrance, ceiling height that meets code, a way to run water and waste to a new kitchen and bathroom, and enough of a footprint that somebody can live there without walking through your living room. Plenty of basements fail on ceiling height alone. Better to learn that in week one than in month four.

Paying for it

Paying for the work is the part clients ask me about, so let me be straight about what I can and can’t help with. I went through all five ways people pay for a project like this a couple of weeks back, and I won’t put you through it twice. That whole comparison is still up on the blog if you want the long version.

The two routes I work with are a cash-out refinance, where you replace your current mortgage with a larger one and take the difference in cash, and a home equity line of credit, which is a second loan against the house that you draw on as you need it rather than taking all at once. Which of those makes sense depends on your current mortgage, how much equity you have, and what the work is likely to cost. What you’d qualify for varies by program, by property and by borrower.

Rolling other debts into the mortgage is the one I want to warn you about. If you’re thinking about folding existing balances in while you borrow for the conversion, know that debts your house isn’t currently backing become debts it is backing, and stretching them over a mortgage’s length can mean paying more interest overall even when your monthly payment drops. That’s a real trade, and I’d want to walk through it with you before you decide.

Before you call anyone, work through this

Most of the wasted money on these projects gets spent in the first month, on plans for something that was never going to be allowed. Run this list first.

  • ☐  Find your zoning district on your city or county’s online zoning map
  • ☐  Call your local planning department and ask specifically whether an attached accessory unit is permitted in your district
  • ☐  If you’re in an HOA, read the covenants for language on separate kitchens, separate entrances and rental of any part of the property
  • ☐  Measure the finished ceiling height of the space you have in mind and check it against your local code minimum
  • ☐  Identify where water and waste would connect for a new kitchen and bathroom, and get a plumber’s opinion before an architect’s
  • ☐  Confirm whether the space would need its own entrance and whether you have somewhere to put one
  • ☐  Get two quotes on the conversion and one on the detached version, so you’re comparing rather than guessing
  • ☐  Work out how much equity you have before you decide how the work gets paid for

Take the list to your planning department before you take it to a builder. The answers are free, they take one phone call, and they determine everything that comes after.

If you want to talk through the financing side once you know what your city allows, give me a call. I’d rather help you work out what’s realistic now than fix a plan that was built on the wrong rules.

Warm lamp-lit shelving unit with plants and books in a living room after dark

The Fall Lighting Fix: What to Change, Room by Room

The Fall Lighting Fix: What to Change, Room by Room 1200 630 Creative Studio

Key takeaways

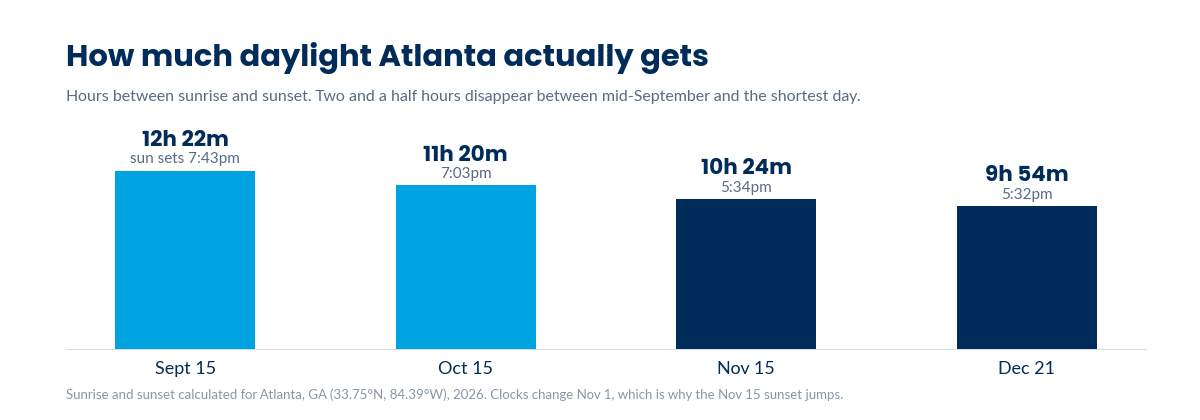
  • Atlanta loses about two and a half hours of daylight between mid-September and the shortest day in December, and the clock change on November 1st moves sunset an hour earlier overnight.
  • A room that feels wrong in winter usually has a lighting problem rather than a paint or furniture problem.
  • Designers treat the ceiling as one layer of three, not as the whole plan. Most rooms want light at three different heights.
  • The useful numbers on a bulb box are lumens for brightness and the Kelvin rating for warmth. Watts tell you almost nothing now.
  • Dimmers and LEDs have to be matched deliberately. The bulb has to be marked dimmable and the dimmer has to be rated for LED.

Every year around the first week of November, I start hearing the same thing from clients. The house feels dark. The living room feels smaller than it did in August. Somebody is thinking about repainting, or replacing a sofa, or wondering whether the windows are the problem. Almost nobody says the word lighting, and lighting is almost always the answer.

It is the least glamorous fix in a house and one of the cheapest, which is probably why it gets skipped in favor of things that cost ten times as much and work less well. So before you spend money on the wrong thing this fall, here is what is actually happening and what to do about it.

The light in your house is about to change, and quickly

We talk about winter as though it arrives in December, but the daylight starts leaving in September and it goes faster than most people expect. In Atlanta, the middle of September gives you a little over twelve hours between sunrise and sunset. By the shortest day of the year that is down to under ten. The sunset itself moves even more sharply than the total, sliding from around a quarter to eight in the evening to just after half past five.

Bar chart showing daylight hours in Atlanta falling from 12 hours 22 minutes on September 15 to 9 hours 54 minutes on December 21

The single biggest jolt comes on November 1st, when the clocks change. On October 31st the sun sets at about a quarter to seven. The next evening it sets at a quarter to six. That is an hour of your evening gone overnight, and it is the week people start describing their house as dark, cramped or depressing without quite knowing why.

Nothing about the house changed. The light did. And the light is the part you can actually do something about.

The mistake designers see most often

Sophie Paterson, a London-based interior designer who has spent sixteen years on residential projects, writes that the most common lighting mistake she sees is people creating a symmetrical grid of spotlights across the ceiling. It looks balanced on a floor plan, she points out, but in real life we rarely look up at the ceiling. What matters is how light behaves at eye level, how it washes a wall, and whether it draws your attention to anything.

Most rooms in most houses were built with a single fixture in the middle of the ceiling, and that one fixture is asked to handle every situation the room ever faces. It has to fill the space, light whatever you are doing with your hands, and make the room somewhere you want to sit. Those are three different jobs, and one bulb overhead does the first adequately and the other two badly.

Designers describe the fix as lighting in layers, and the vocabulary is more useful than it sounds. Ambient light is the general fill, usually your ceiling fixture. Task light is aimed at what you are actually doing, so a lamp beside the reading chair, something under the kitchen cabinets, a proper light over a desk. Accent light has no job except to make the room feel good, like a small lamp on a shelf or a light behind a plant.

Paterson also makes a point that reframes the whole thing: good lighting is not about making a room bright enough, it is about creating focus and contrast. Your eye goes to the brightest thing in the room. If you want a space to feel longer, light the far end of it. If you want a corner to feel like somewhere to sit, light it low.

The reason a hotel room or a friend’s living room feels better than yours often comes down to nothing more than this. They have three or four light sources at different heights. You have one, twelve feet up, pointing down.

If you do only one thing this fall, add a second light source at eye level or below in the room where you spend your evenings. It is a bigger change than paint, and it takes twenty minutes.

What the numbers on the box actually mean

Bulb packaging got confusing when incandescent bulbs went away, and plenty of people are still buying by watts out of habit. Watts measure how much electricity a bulb draws, which mattered when every bulb was equally inefficient. Now it tells you almost nothing about how bright the thing will be.

The number you want is lumens, which measures actual brightness. The Department of Energy’s guidance is that if you’re replacing what used to be a 75-watt bulb, you’re looking for roughly 1,100 lumens, and you can get that from an LED drawing as little as nine watts. Every bulb sold in the United States has carried a Lighting Facts label since 2011, modeled on the nutrition labels on food, and brightness in lumens sits right at the top of it.

The second number is the Kelvin rating, and this is the one that decides whether a room feels warm or clinical. A lower Kelvin number gives the soft yellow light people associate with an old incandescent bulb. A higher number gives a whiter, bluer light that reads as daylight. Paterson’s studio uses 2700K as its default for most rooms, describing it as warm without being overly yellow, and advises keeping the temperature consistent within a single space because mixing tones in one room feels jarring.

That last point explains something that frustrates a lot of people. If your living room has a warm bulb in the lamp and a cool one in the ceiling, the room will never quite settle, and no amount of repainting will fix it. It also explains why paint colors look so different after dark. You didn’t choose the wrong color, you’re looking at it under a different light than the one you chose it in.

Lighting is about 15% of an average home’s electricity use, according to the Department of Energy, and LEDs use up to 90% less energy and last up to 25 times longer than the incandescent bulbs they replaced. Adding lamps to a room doesn’t carry the running cost it would have twenty years ago.

Before you buy a dimmer, check the bulb

This is the part that catches people out, and it is the one thing here I would check before spending anything. Dimmers and LED bulbs have to be matched on purpose, and two things have to line up. The bulb has to be marked dimmable on the box, because a lot of LEDs are not and were never designed to be. And the dimmer itself has to be rated for LED. Lutron, which makes most of the dimmers in American houses, is explicit about this: a dimmer rated only for incandescent or halogen can control only incandescent or halogen bulbs, while a dimmer rated for LED can handle those as well. That older dimmer in your hallway was very likely built for incandescent bulbs and predates LEDs entirely.

Even within the dimmable category, manufacturers only stand behind combinations they have tested. Lutron publishes a compatibility tool listing the specific bulbs it has tested against each of its dimmers, and tells customers that if a bulb is not on that list, they should ask the bulb manufacturer for a recommendation. Mismatched pairs tend to announce themselves through flicker, buzzing, a narrow dimming range that drops straight to off, or bulbs that fail well before the life printed on the box.

None of that is a reason to avoid dimmers. A room that can be bright at six and soft at nine is effectively two rooms, and dimmers are the upgrade people most often say they should have done sooner. Just buy the bulb and the dimmer as a pair rather than assuming the bulbs you already own will work.

Where the money actually goes

Lighting covers an unusually wide range of cost, and the cheap end does more than people assume. Swapping bulbs is the smallest possible spend and it’s where I’d start, because changing the Kelvin rating of the bulbs you already own costs the price of a multipack and changes how every room reads at night. Plug-in lamps are the next step up, and a floor lamp or two in the corners of a room is the most reliable fix for the one-fixture problem. Paterson makes the point that you don’t need a renovation to change a room’s lighting at all: freestanding uplighters behind a sofa or on either side of a fireplace do a great deal of work for very little money.

Dimmers sit in the middle, with the compatibility caveat above. Above that you’re into hardwired work: a new ceiling fixture, wall lights, or under-cabinet lighting in the kitchen. That’s where an electrician gets involved and where the numbers start climbing. If you’re going that far, get everything quoted together rather than one job at a time.

If you’re thinking about listing in the spring

Here is where this stops being decorating and starts mattering to your bottom line. Most people who plan to sell in spring start getting the house ready in February or March, which is exactly the wrong order. The work you do now is the work you get to live with and adjust before anyone photographs it. Lighting is the clearest example, because it changes how a house reads in photographs and it changes how it feels in an evening showing, and those are two different problems.

Listing photos are usually shot in good daylight, and mismatched bulb temperatures are much more obvious in a photograph than they are to your eye standing in the room. One warm lamp and one cool ceiling fixture in the same shot gives you an orange corner and a blue corner, and buyers read that as a house that has been neglected rather than a house with two different bulbs in it. Making the temperature consistent room by room costs almost nothing and is one of the few things you can fix in an afternoon.

Evening showings are the other half. From November through February, most weekday showings happen after dark, and a house with one ceiling fixture per room shows badly at six in the evening in a way it never does at noon. Hallways, stairs and entryways matter most here, because they are the first thing a buyer walks through and they are almost always the worst lit part of a house.

I want to be careful not to overpromise. Nobody can tell you that a set of lamps will raise your sale price, and any improvement that comes with a guaranteed return is being sold to you by someone who does not know that. What I can say is that it is cheap, it is quick, and it addresses the thing buyers actually notice on a winter evening.

If selling next year is on your mind at all, that is the conversation I would rather have now than in March. Most people who sell are buying something next, and the two decisions are connected in ways that are much easier to work through early. Give me a call and we can talk about what your timing actually looks like. There is nothing to sign and nothing to commit to.

Your room-by-room walkthrough

Go through the house one evening after dark, with the lights on the way you normally have them. Not during the day, and not with everything switched on. The point is to see the rooms the way you actually live in them, and the way a buyer would see them at a six o’clock showing in January.

  • ☐  Living room: count your light sources. If the answer is one, add a floor lamp in the darkest corner.
  • ☐  Every room: check the Kelvin number on your bulbs and make it consistent within each space.
  • ☐  Kitchen: stand at the counter where you chop. If your body throws a shadow onto the work surface, you need light under the cabinets.
  • ☐  Bedroom: make sure each side of the bed has its own light that can be switched off without getting up.
  • ☐  Hallways, stairs and entryway: almost always the worst lit space in a house, and the first thing a visitor walks through.
  • ☐  Home office or desk: add a dedicated task light rather than relying on the ceiling and the screen.
  • ☐  Any room you avoid in the evening: ask whether you avoid it because it’s cold, cluttered, or just badly lit.
  • ☐  Dimmers: confirm the bulbs are marked dimmable and the dimmer is rated for LED before you buy either.
  • ☐  Front entry and porch: dark by five in December, and the first thing guests and buyers see.
  • ☐  Make a list of anything needing an electrician and get it all quoted together.

Work down that list and most people find three or four fixes, none of them expensive, that change how the house feels for the four months it matters most. Start with the room where you spend your evenings, and start before the clocks change rather than after.

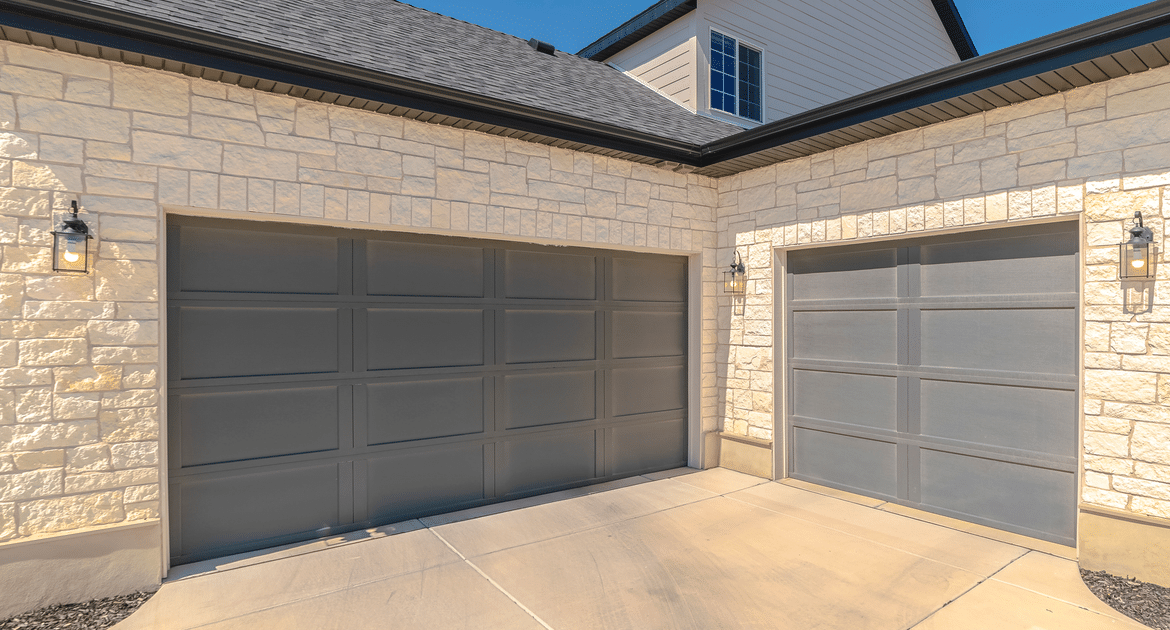
Two-car garage with stone facade and driveway

The 5 fall upgrades worth doing… and the 2 people regret

The 5 fall upgrades worth doing… and the 2 people regret 1200 630 Your Loan Officer for Life

Key takeaways

  • Eight of the top ten highest-returning projects this year are on the outside of the house.
  • A garage door replacement returns roughly 268% of its cost, the best of any project measured.
  • The only interior job in the top five is a minor kitchen refresh, not a full renovation.
  • Large additions and gut kitchens sit near the bottom. Wonderful to live in, poor at resale.
  • Exterior work pays you back when you sell. Interior work pays you back while you live there.

Most of us assume the money goes back into the house when we renovate. Some of it does. A lot of it doesn’t, and the difference isn’t where most people would guess.

Zonda’s Cost vs. Value report has been tracking this question for 38 years. It compares what a remodeling project costs against how much of that cost comes back in the sale price, using cost data from Verisk’s XactRemodel estimating platform and surveys of real estate professionals across 119 local markets. The newest edition, published in September 2025, found the same thing it found the year before, and the year before that… the projects that pay you back are almost all on the outside of the house.

Eight of the top ten are things a buyer sees before they ever walk through the front door.

That’s worth sitting with for a second, because it runs against almost everything we’re told. The kitchen and the primary suite get all the attention. They’re what people photograph, what they save to Pinterest, what they daydream about. They’re also, on average, where the least of your money comes back.

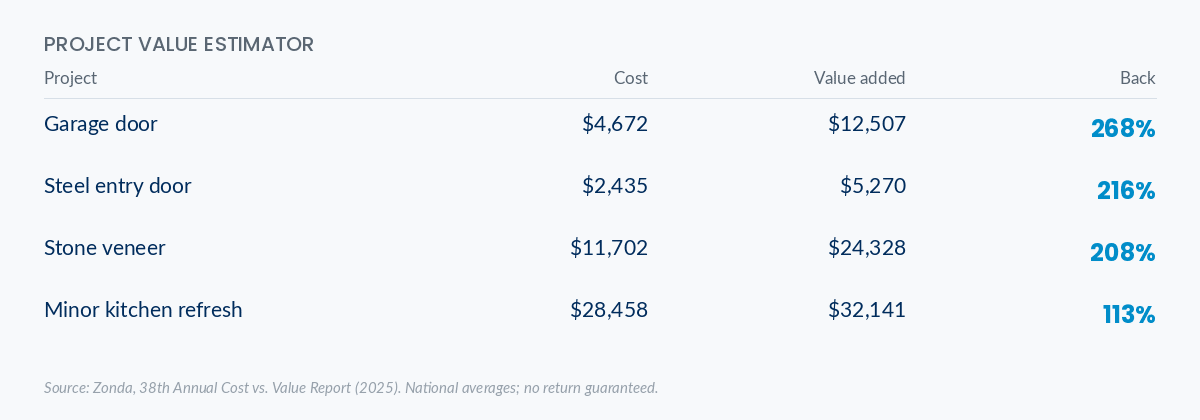
Project value estimator: garage door 268%, steel entry door 216%, stone veneer 208%, minor kitchen refresh 113% of cost recouped

What pays you back

1. Garage door replacement. First place, two years running, and it isn’t close. Average cost is $4,672 and it adds an average of $12,507 in resale value. That’s roughly 268% of what you put in.

It’s an odd winner until you think about how a house is actually seen. On most homes the garage door is the single largest visible surface from the street. A dented, faded, original-to-1998 door quietly ages the whole front of the house, and a new one quietly un-ages it. It’s a one-day job.

2. Steel entry door replacement. Second, at about 216%. Average cost $2,435, returning around $5,270. It’s the smallest job on the entire list.

A front door is the one part of the house every single visitor touches. If yours sticks, rattles, or has a draft you’ve stopped noticing, that’s the impression people are forming while they wait for you to open it.

3. Manufactured stone veneer. Third, at roughly 208%. Costs about $11,702 and adds about $24,328. This is usually a partial application, on a front facade or around an entry, rather than the whole house.

4. Fiber-cement siding replacement. About 114%. At roughly $21,485 it’s a considerably bigger job than the three above it, and it still returns more than it costs. It also solves maintenance problems rather than just cosmetic ones, which is worth something the report doesn’t measure.

5. Minor kitchen remodel. About 113%, at around $28,458. New cabinet fronts, new hardware, new counters, updated sink and fixtures. Crucially, this is not a tear-out. The layout stays. The plumbing stays.

It’s the only interior project in the entire top five, and it beats a full gut renovation by an enormous margin. If you’ve been putting off the kitchen because you assumed the only option was the expensive one, this is the finding worth knowing about.

What people tend to regret

Large additions and full kitchen gut renovations sit near the bottom of the same list.

That deserves a fair hearing, because “regret” is the wrong word if you’re staying put. A primary suite addition that gives your family another decade of comfortably living in a house you love is a good decision, whatever the resale math says. Zonda’s own editors make this point… large interior remodels are often too subjective to return the same value at resale, but they make the most sense for people planning to stay a long while.

The trouble is when people take on a big interior project expecting it to come back at closing. That’s where the disappointment lives. Not in the project. In the expectation attached to it.

The real split

Here’s the cleanest way to think about all of it.

Exterior projects pay you back when you sell. Interior projects pay you back while you live there.

Both are legitimate. They’re just not the same decision, and the honest first question is which one you’re actually making. If you’re planning to list in the next couple of years, the top of that list is where your money works hardest. If you’re planning to stay ten years and the kitchen makes you unhappy every single morning, fix the kitchen and stop reading ROI tables.

Why fall is the moment

Most of this work needs dry, moderate temperatures. Roofing, siding, exterior painting and deck work all depend on it, and once the weather turns you’re into freeze-thaw season when a lot of it simply can’t be done well.

The scheduling piece matters more than people expect. Contractor calendars fill quickly as autumn gets going, and homeowners who wait end up compressed against winter deadlines, which is where rushed work and inflated quotes come from. Booking in early fall usually gets you a better crew, a better price, and a project that finishes before the cold does.

Your fall project shortlist

Walk the outside of your house and check off what applies. Then take this to whoever you’re getting quotes from.

  • ☐  Garage door. Is it original to the house? Dented, sagging, noisy, or a different white than everything else?
  • ☐  Front door. Does it seal, latch cleanly, and look like it belongs to the same house as the rest of the trim?
  • ☐  Siding and trim. Any soft spots, gaps at the joints, or paint failing on the sun-facing side?
  • ☐  Entry facade. Would partial stone or a rebuilt surround change how the front reads from the curb?
  • ☐  Kitchen. Could fronts, hardware and counters get you most of what you wanted from a gut job?
  • ☐  Get quotes before October. Ask every contractor how far out they’re currently booking.

Rough cost tiers, from the same report. Under $5,000 covers a garage door or an entry door. $10,000 to $15,000 gets you into stone veneer. $20,000 and above is siding and a minor kitchen refresh.

Paying for it

Most people funding a project this size are choosing between savings, a card, a personal loan, or borrowing against the equity in the house. Those are genuinely different tools with different costs and different consequences, and the right one depends heavily on how long you plan to stay and what else is on your balance sheet.

That’s a conversation worth having before you sign a contract rather than after. We’re happy to walk through the options with you and tell you honestly if borrowing isn’t the right move. Sometimes it isn’t.

Questions we get asked

Does a new roof pay for itself? Roofing didn’t crack the top ten this year, but it’s rarely a discretionary choice. A failing roof isn’t an ROI decision, it’s a condition issue that can hold up a sale or an appraisal entirely.

Is solar worth it? Rooftop solar was newly added to the report this year and the payoff varies widely by market and utility. It’s one where local numbers matter far more than national averages.

What about a basement? Basement remodels were also new this year, and of the recent additions they showed the most consistent return nationwide.

Should I do any of this if I’m not selling? Only if you want it. Everything above is measured against resale value. If you’re staying, the better question is what you’ll enjoy, and whether it’s worth the cost to you.


Source: Zonda, 38th Annual Cost vs. Value Report, published September 18, 2025. Figures are national averages and vary considerably by local market; Atlanta-area numbers will differ. MiLEND does not provide contracting, appraisal, or investment advice, and no return on any home improvement is guaranteed. MiLEND, Inc. NMLS #148769. Equal Housing Lender.

Homeowner’s Fall Maintenance Checklist

Homeowner’s Fall Maintenance Checklist 1232 821 Your Loan Officer for Life

Key Takeaways

  • Prevent Costly Repairs by Tackling Fall Maintenance Now: Regular fall maintenance tasks like cleaning gutters, sealing drafts, and inspecting your heating system can prevent major issues, saving you from expensive repairs down the road.
  • Improve Energy Efficiency: Sealing windows, checking insulation, and maintaining your heating system can reduce energy costs, keeping your home warmer during the cold months while lowering utility bills.
  • Protect Your Home from Winter Weather: Prune overhanging branches, fix driveway cracks, and repair exterior paint to protect your home from the harsh effects of winter storms, ensuring it remains safe and in good condition all season.

Fall is on the way and with it comes the perfect opportunity to get your home ready for the winter months ahead. Taking care of these maintenance tasks now can save you money, prevent costly repairs, and keep your home running smoothly all winter long.

Whether you’re a seasoned homeowner or new to homeownership, this fall maintenance checklist is designed to make managing all your fall home maintenance simple and easy, while making sure nothing gets overlooked.

1. Inspect and Clean Gutters and Downspouts

As the leaves start falling, they tend to find their way into your gutters, and while those autumn colors are beautiful, clogged downspouts are not. This is one of those maintenance tasks that can save you from major headaches later on.

  • Why It Matters: Clogged gutters can lead to water damage in your home’s roof, siding, and even foundation. When water overflows from blocked downspouts, it can pool around your foundation, increasing the risk of leaks, erosion, and costly repairs. In the winter, water trapped in gutters can freeze, creating ice dams that can damage your roof.
  • What to Do: Get up on that ladder (or hire someone if you’re uncomfortable doing it yourself) and clean out all the leaves, sticks, and debris from your gutters and downspouts. Make sure water flows freely to prevent backup. While you’re at it, check for any loose or damaged sections of gutter and repair them as needed.
  • Pro Tip: Consider installing gutter guards to keep debris out and reduce the frequency of gutter cleaning. It’s a small investment that can save you time and hassle down the road.


2. Seal Drafts and Check Insulation

Feeling small drafts sneaking in around your windows or doors? It’s time to seal things up before winter sets in. Not only will sealing drafts keep you warmer, but it will also help reduce your energy bills—who doesn’t love that?

  • Why It Matters: Drafty windows and doors let cold air in and warm air out, which forces your heating system to work overtime. This can lead to higher energy bills and a less comfortable home. Proper insulation is crucial for keeping the warm air in and preventing your pipes from freezing when temperatures drop.
  • What to Do: Check around your windows and doors for drafts by running your hand along the edges to feel for cold air. Apply weather stripping or caulking where needed to seal any gaps. Don’t forget to check other areas where drafts might sneak in, like your attic, basement, and around electrical outlets on exterior walls. Also, take a look at your attic insulation. If it’s looking thin, consider adding more to keep your home warmer this winter.
  • Pro Tip: Consider upgrading to energy-efficient windows if yours are older or particularly drafty. They’re an investment upfront but can significantly reduce heating (and cooling) costs in the long run.

3. Service your Heating System

Your heating system is about to become your home’s MVP, so now’s the time to make sure it’s in good working order. Regular maintenance can keep it running efficiently, extend its life, and help you avoid emergency repair calls on cold nights.

  • Why It Matters: A well-maintained heating system operates more efficiently, meaning it uses less energy to heat your home, which saves you money. Regular checkups also help identify potential issues early, so you can avoid expensive repairs or, even worse, system failures in the middle of winter.
  • What to Do: Schedule a professional tune-up for your furnace or boiler before the cold sets in. The technician will clean the system, check for leaks or worn parts, and make sure everything is functioning as it should. If you have a fireplace or wood stove, now is the time to get the chimney inspected and cleaned to prevent creosote buildup, which can be a fire hazard.
  • Pro Tip: Change your HVAC filters regularly, especially during the heating season. Dirty filters reduce airflow and make your system work harder than it needs to, which increases your energy usage and wears down the system faster.

4. Test Smoke and Carbon Monoxide Detectors

As we rely more on heating systems, fireplaces, and space heaters during the colder months, it’s more important than ever to ensure your smoke and carbon monoxide detectors are working properly. These little devices are life-savers—literally.

  • Why It Matters: Smoke and carbon monoxide detectors provide early warnings of danger, allowing you and your family to get to safety in case of a fire or carbon monoxide leak. Faulty heating equipment is a leading cause of both house fires and carbon monoxide poisoning during the winter.
  • What to Do: Test each detector by pressing the test button. Replace any batteries that are running low, and if your detectors are over 10 years old, it’s time to replace them entirely. Make sure you have detectors installed near bedrooms, on every level of your home, and close to potential sources of carbon monoxide, like furnaces and fireplaces.
  • Pro Tip: Consider upgrading to smart smoke and carbon monoxide detectors. These devices send alerts to your phone if they detect a problem, even when you’re not home.

5. Inspect Fire Extinguishers

With the increased use of fireplaces, space heaters, and holiday cooking, it’s a good time to ensure your fire extinguishers are ready for action—just in case.

  • Why It Matters: Having a fire extinguisher on hand can prevent a small fire from becoming a big disaster. But only if it’s charged and easily accessible when you need it most.
  • What to Do: Check that each fire extinguisher in your home is fully charged and hasn’t expired. Make sure you have extinguishers in key areas like the kitchen, garage, and near fireplaces. If your extinguisher is expired or damaged, replace it.
  • Pro Tip: If you don’t have fire extinguishers in your home, now’s the time to invest in a few. It’s a small purchase that can make a huge difference in an emergency.

Photo of a bathtub with a white towel draped over the edge featuring a low flow faucet.


6. Flush your Hot Water Heater

Sediment buildup in your water heater can reduce its efficiency and shorten its lifespan. Flushing your water heater is a simple way to keep it running smoothly and ensure you have hot water all winter long.

  • Why It Matters: When sediment builds up in the bottom of your water heater, it reduces its ability to heat water efficiently, leading to higher energy bills and less hot water for your home.
  • What to Do: To flush your water heater, turn off the power or gas supply, attach a hose to the drain valve, and let the water run out until it’s clear of sediment. If you’re not comfortable doing this yourself, call in a professional to handle it for you.
  • Pro Tip: Consider installing a water heater blanket to help insulate your unit and reduce energy usage, especially if it’s located in a cold area like the garage or basement.

7. Repair Walkways and Driveways

Small cracks in your walkways or driveway might not seem like a big deal now, but they can quickly worsen in the winter when water gets into the cracks, freezes, and expands. Fall is the best time to fix these issues before they become more serious.

  • Why It Matters: Preventative maintenance now can save you from more extensive (and expensive) repairs in the spring. Plus, repairing cracks reduces tripping hazards when those surfaces are covered in snow or ice.
  • What to Do: Inspect your walkways and driveway for cracks or uneven surfaces. Use concrete or asphalt patching products to repair cracks before the cold weather sets in.
  • Pro Tip: After repairs, consider sealing your driveway to protect it from winter weather and extend its life.

8. Fix Holes and Tears in Window Screens

Your window screens might not get much use during the colder months, but now’s the perfect time to repair any damage before winter weather sets in.

  • Why It Matters: Damaged screens not only let in insects during warmer months but can also allow small critters looking for warmth to sneak into your home during winter. Plus, taking care of them now means one less thing to worry about when spring arrives.
  • What to Do: Inspect your window screens for holes, tears, or loose frames. Use a screen repair kit to patch small holes, or replace the screen entirely if needed.
  • Pro Tip: Store removable screens in a safe place during the winter months to prolong their lifespan and prevent damage from snow and ice.

9. Fertilize your Lawn and Shrubs

Even though your lawn and plants are heading into dormancy for the winter, giving them some attention now can help them come back strong in the spring.

  • Why It Matters: Fertilizing in the fall helps your lawn and shrubs develop strong root systems that will help them bounce back quickly once warmer weather returns. It also helps prevent winter damage to your grass and plants.
  • What to Do: Apply a fall fertilizer that’s high in phosphorus to encourage root growth. Be sure to fertilize before the ground freezes so your lawn and shrubs can absorb the nutrients.
  • Pro Tip: Consider aerating your lawn before applying fertilizer. This will help the nutrients reach deeper into the soil and promote healthier growth in the spring.


10. Prep your Grill for Winter

If your grill has been your go-to for summer cookouts, now’s the time to clean and store it properly for the winter so it’s ready to go when grilling season comes back around.

  • Why It Matters: Cleaning and winterizing your grill extends its life and ensures it will be ready to use when warmer weather returns. Plus, it prevents grease and food buildup from attracting unwanted pests.
  • What to Do: Give your grill a thorough cleaning, making sure to remove grease, food debris, and ash from the grates and interior. Disconnect and store propane tanks in a cool, dry place, and cover your grill to protect it from the elements.
  • Pro Tip: Consider moving your grill to a covered area, like a garage or shed, to provide extra protection from snow and ice during the winter months.

11. Touch up Exterior Paint

Before winter weather has a chance to take its toll, inspect your home’s exterior paint for any areas that need attention. Chipped or peeling paint can allow moisture into the wood, leading to rot and other damage.

  • Why It Matters: Touching up paint helps protect your home’s exterior from moisture, ice, and snow. Plus, it keeps your home looking sharp and helps maintain curb appeal.
  • What to Do: Walk around your home and look for areas where paint is chipped, peeling, or faded. Scrape off any loose paint and apply a fresh coat to seal and protect the exposed wood or siding.
  • Pro Tip: Use a high-quality exterior paint designed to withstand harsh weather conditions. If you live in an area with extreme cold or snow, consider using paint with added protection against moisture.

12. Trim Trees and Landscaping

Winter storms can bring heavy snow and ice, which can weigh down tree branches and cause them to snap. Trimming your trees and landscaping in the fall can help prevent damage to your home during winter weather.

  • Why It Matters: Overhanging branches can cause serious damage to your roof, windows, or siding if they break during a storm. Removing dead or weak branches now reduces the risk of damage and keeps your landscaping healthy.
  • What to Do: Trim back any branches close to your home or appear dead or weakened. If you’re dealing with large trees, consider hiring a professional arborist to ensure the job is done safely.
  • Pro Tip: Don’t forget to clean up any fallen leaves from your yard, especially on walkways and driveways, to prevent them from becoming slippery hazards as temperatures drop.

Wrapping Up

Taking care of these fall maintenance tasks now will help you avoid costly repairs, keep your home comfortable, and ensure everything runs smoothly through the winter months. From cleaning gutters and sealing drafts to fertilizing your lawn and prepping your grill, each of these tasks plays a vital role in protecting your home and getting it ready for the cold weather ahead.

We designed this article to be as comprehensive as possible. Let us know if we missed anything on your fall maintenance to-do list in the comments!

.

Smart Ways to Save Money on a Tight Budget
Read more...
Discover 2024’s Top Neighborhoods with Smart Financing Options
Read more...

Essential Spring Home Maintenance Tips: Refresh and Revitalize Your Home

Essential Spring Home Maintenance Tips: Refresh and Revitalize Your Home 1920 1280 Your Loan Officer for Life

Key Takeaways

  • Preventative Maintenance Saves Money: Tackling essential spring maintenance tasks like inspecting your roof, cleaning gutters, and checking your air conditioning system can prevent minor issues from becoming costly repairs, ensuring your home remains in top condition while saving you money in the long run.
  • Enhance Home Comfort and Efficiency: Spring is the perfect time to improve your home’s comfort and energy efficiency. From sealing windows and doors to refreshing your deck, these maintenance tasks help keep your home cool and comfortable during the summer months while reducing energy costs.
  • Prepare for Summer Enjoyment: Get your home ready for summer enjoyment with a thorough spring cleanup and setup. Whether it’s preparing your lawn and garden, refreshing outdoor living spaces, or ensuring your home safety devices are updated, these efforts will make your home a safer and more enjoyable place for the sunny days ahead.

Spring is a season of renewal and fresh beginnings for many of us – a fresh wardrobe, new plants, a seasonal interior look, and a thorough spring cleaning. It’s also the ideal time to give our homes the essential maintenance they need to prepare them for the summer days ahead. Whether you’re a seasoned homeowner or new to the game, check these essential Spring maintenance items off your to-do list to protect your home and keep your space fresh, efficient, and comfortable through the rain and heat in the coming months.

Inspect Your Roof and Gutters

Winter can be harsh on your home’s exterior, especially on your roof and gutters, from months of accumulating dead leaves and brisk winter winds. Start your spring maintenance by inspecting your roof for any damages such as missing, loose, or damaged shingles. You don’t need to scale it like Everest – just grab a pair of binoculars and scan for missing shingles or wear and tear. A small roof leak now can turn into big wood rot, staining, and mold growth when the summer heat and humidity set in.

Don’t forget to clear debris from your gutters to ensure proper drainage and prevent water damage. A quick run with a powerful leaf blower followed by a good hose down should clear most debris. It’s also a good idea to check for clogs in your drain spouts and make sure they are positioned to properly drain run-off away from your foundation. A clear gutter means clear paths for spring showers to flow away from your home, not into it.

Check Your Home’s Exterior

Take a walk around your home and inspect the siding. Look for signs of damage or wear, such as cracks or warping. Keep an eye out for signs of insect damage too from borer bees, carpenter ants, and termites. Termites are especially drawn to wet and soft wood, so replacing or filling damaged siding early can prevent a lot of problems later on.

Early spring is the ideal time to schedule repairs or consider a fresh coat of paint to protect and beautify your home’s exterior. Paint not only beautifies your home but also acts as a shield against the elements to protect it from wood rot, dry splitting, and warping.

Photo of an exterior HVAC unit in grey metal against a beige stucco wall.

Prepare Your Air Conditioning System

Before the heat sets in, let’s ensure your AC is ready to keep you cool without a hiccup. The last thing you want is an AC failure in the dead of summer when repairs can take longer to schedule and parts are more likely to be on backorder. Replace the filters to improve the air quality in your home and to improve airflow through your AC system. A clogged filter reduces airflow and can cause strain on your system over time, so this is one of the easiest maintenance items you can keep up with to extend the life of your unit.

If you’ve noticed any strange sounds, odors, or the air coming out of your vents isn’t as cool as it used to be, consider scheduling a routine inspection to identify potential issues early before the strain of a summer heat wave.

Spruce Up Your Lawn and Garden

Your yard is more than just space; it’s your outdoor living room. Early spring is perfect for raking, seeding, and planning those garden beds. Whether you dream of a vegetable garden or a flower-filled sanctuary, Spring is planting season and a great time to re-envision your exterior spaces. Start plotting out where you’ll want to add any new trees, shrubs, pops of colorful flowers, and mulch or pine straw for a clean, well-groomed landscape that you enjoy spending time in all summer long.

While you’re at it, why not invite more local wildlife to your outdoor sanctuary? You could add a bird feeder or two. Or thing about putting in a small pond to encourage frogs and butterflies to take us residence.

Refresh Your Deck or Patio

Your deck or patio is the stage for summer barbecues and evening stargazing, and it’s the heart of many summer activities with friends and family. Getting your deck in tip-top shape will go a long way in making it the perfect summer backdrop for making memories. Inspect your deck or patio for any winter damage. Look for loose boards or railings, and consider resealing or staining wood surfaces to protect them from the elements and keep them looking great.

Adding new outdoor furniture, potted plants, or accent pieces can also refresh your outdoor living spaces and invite you to spend more time outdoors in a space you love and enjoy.

Safety First! Your Home Safety Devices

Our homes’ unsung heroes, smoke detectors and carbon monoxide detectors, deserve a round of applause…and a battery check. While you’re working on a to-do list, this is a great reminder to check and maintain your home’s safety devices. Test smoke detectors and carbon monoxide detectors, and replace the batteries if needed.

It’s also a smart idea to check the expiration date on your fire extinguisher and review your family’s emergency plan in case of fire, dangerous storms, or other natural disasters. Do you have the essentials like flashlights, food, and water on hand in case of a blackout or a broken water main?

Declutter and Deep Clean

Nothing says spring like a fresh, clean home. Spring cleaning is a time-honored tradition for a reason. It’s about clearing out the old to make room for the new. It’s a chance to declutter, deep clean, and maybe even rediscover some long-lost treasures. Take this opportunity to declutter and deep clean your space. This doesn’t have to be a time-consuming job. Break it up into 15-30 tasks and you’ll be amazed at how quickly you’ll get your home in tip-top shape without getting overwhelmed.

Go room by room, donating items you no longer need, and tackling those often-neglected areas like baseboards, windows, and underneath furniture. The reward is a fresher home that is easier to breathe in, easier to maintain and feels brighter and healthier.

Photo of a home interior with energy efficient windows recently installed.

Seal Windows and Doors

Check the seals around windows and doors to ensure they’re tight. Any gaps can let in warm air and let your air-conditioning leak out during the summer, increasing your energy costs. Replacing seals or caulking gaps is a simple, cost-effective way to improve your home’s energy efficiency and keep your electric bills under control in the peak of summer.

Prepare Outdoor Faucets and Sprinklers

Summer fun means outdoor water. There are cars to wash, lawns that need to be sprinkled, and inflatable pools or slip-n-slides to enjoy! Turning back on the outdoor waterworks without leaks or surprises is the goal. Check outdoor faucets and sprinkler systems for leaks or damage and make any necessary repairs to ensure they’re ready for use.

Plan for Home Improvement Projects

Spring is an ideal time to plan and budget for any home improvement projects you’ve been considering. Maybe it’s the year you finally update the back patio or remodel the kitchen. Planning ahead ensures your projects are completed in time to enjoy throughout the year. If you need any advice on financing your home improvement projects, I’d be happy to walk you through the pros and cons of different financing options and help you pick the perfect fit with the best terms for your needs!

Maintaining your home in spring not only prepares it for the summer but also prevents potential problems from turning into expensive repairs. By following these essential spring home maintenance tips, you can ensure your home is safe, efficient, and beautiful, allowing you to enjoy all the season has to offer.

As you embark on your spring maintenance journey, remember that every home is unique. Tailor these tips to suit your home’s specific needs and your personal preferences.

Spring into Action Together

Spring home maintenance is more than just a checklist; it’s an investment in your home and your quality of life. Each task you tackle is a step towards a home that’s not just maintained but truly loved. By taking the time to inspect, clean, and update your home, you’re not only preserving its value but also creating a more comfortable and inviting space for yourself and your loved ones.

Remember, a well-loved home is the heart of a well-lived life. And if you ever need a hand or a friendly word of advice, my team at Milend is always here, ready to help you make your home the best it can be.

Don’t miss out on more tips and tricks for making your home a haven – sign up for our newsletter today!

Photograph of a brick red house with white window trim against a mountain cliff with a potted fern and trees along the driveway.
Creative Financing Options for Home Buyers: A Guide to Making Your Dream Home a Reality
Read more...
Spring Market Preview: What to Expect in Real Estate
Read more...
Photo of a man on a tile roof holding a solar panel to install solar energy on his home.

Eco-Friendly Homes: Healthier, Happier Home Finances

Eco-Friendly Homes: Healthier, Happier Home Finances 1920 1271 Your Loan Officer for Life

Key Takeaways

  • Significant Savings and Sustainability: Eco-friendly home upgrades like LED lighting, high-efficiency appliances, and solar panels not only reduce your carbon footprint but also offer substantial savings on utility bills. These green choices can lead to long-term financial benefits, including lower energy costs and potential tax incentives.
  • Improved Home Comfort and Health: Upgrading to energy-efficient windows, adding insulation, and using sustainable materials can significantly enhance your home’s comfort. These improvements lead to better temperature control, reduced noise levels, and improved air quality, creating a healthier living environment for you and your family.
  • Increased Property Value: Investing in eco-friendly home upgrades can raise your property’s value and appeal to future buyers. Features like solar panels and energy-efficient appliances make your home stand out in the market, potentially leading to a higher appraisal value and a quicker sale.

In today’s world, sustainability has infused every aspect of our lives, from recycling, to buying local, to eating farm-to-table. Our homes are no exception to the great push into going green, with many home buyers looking for eco-friendly homes that are cozy, comfortable havens with a smaller utilities footprint.

On top of adding appealing features to your home for potential buyers, you might want to look to eco-friendly upgrades for the tangible benefits of saving money, enhancing comfort, and increasing property value.

Why Eco-Friendly Homes Are a Big Deal

Your home is more than just a place to crash, it’s a reflection of your personality and values. Eco-friendly home upgrades are designed to reduce your household’s carbon footprint by utilizing less water, energy, and natural resources. These upgrades can significantly reduce your monthly utility bills, improve indoor air quality, and even raise your property value.

These upgrades not only cut down on your utility bills (though that’s a pretty sweet perk!); they also improve air quality, creating a healthier, more comfortable space for your loved ones. Energy-saving windows, for example, can raise your property value and give your home that special glow that says, “Hey, future buyers, I’m a gem!”

Since energy costs are continually rising, and homebuyers are increasingly environmentally conscious, the appeal of a sustainable home has never been higher.

Picture of a clear LED bulb against a blurred background.

The Best Spots to Go Green

Let There Be (LED) Light: Swapping out those old bulbs for LED ones? A total game-changer for saving energy. Upgrading to LED lighting, energy-efficient appliances, and smart thermostats can drastically save on energy consumption. High-efficiency heating and cooling systems also save energy while making your home more comfortable. One thing about LED bulbs I learned the hard way is that you’ll also want to change your wall switch if you want them to last for the maximum lifespan.

Water-Saving Wonders: Those low-flow faucets, showerheads and toilets? They reduce water usage without significantly compromising performance.

Cozy Up with Insulation: Upgrading your insulation and investing in energy efficient windows help keep your home comfy season after season. Look for products with high R-values and ENERGY STAR ratings to keep your home comfortable year-round, reduce energy consumption, and lower heating and cooling costs.

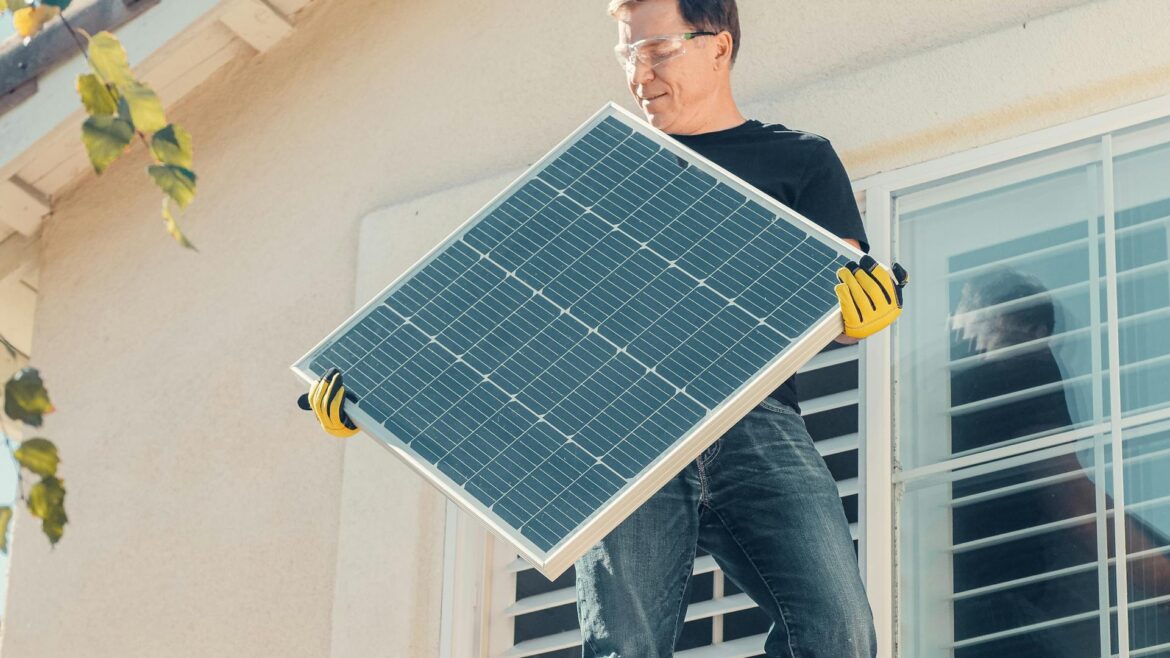
Solar Panels: Sunshine Superheroes: Imagine tapping into the Sun’s power to light up your home. Solar panels do just that AND seriously cut down your electricity bills. Solar panels are a big investment, but they can pay for themselves and then some over the long-term by reducing your electric bill. In some cases, you’ll even come across government incentives or tax breaks to make this an even sweeter deal. Keep in mind that solar panels have a drop-off in power production over time (often after 10 years). So, give this one plenty of thought and research before deciding if solar power is right for your home.

Stylish and Sustainable Materials: From bamboo floors to recycled glass countertops, choosing sustainable materials means your home is not just green—it’s stylish too. If you’re having a custom home built, or renovating an existing home, keep an open mind to sustainable materials like bamboo flooring, recycled glass countertops, recycled brick, reclaimed wood, and non-VOC paints. These materials are environmentally friendly, can make your home healthier, and add unique beauty and character by incorporating more natural materials. It can even be friendlier for your budget if you try sourcing recycled and reclaimed materials through Facebook Marketplace or Nextdoor.

Photo of a woman in a blue t-shirt taking cash out of a wallet.

The Wallet-Friendly Perks of Going Green

I know I talked about how each of these eco-friendly upgrades saves you money, but I want to talk about the big financial picture. Investing in green upgrades can be an investment up front, so the out of pocket can seem like a big hurdle to get to the benefit of long-term savings.

But think about the freedom of having fewer monthly bills and more going back into savings each month for years! Upgrades like these truly are the gift that keeps on giving – giving peace of mind, savings, and growing home equity. Lower utility bills, less maintenance, and even some sweet tax incentives make these upgrades a smart move for your budget and your financial wellbeing for years to come. Consider that energy and repair costs will keep rising in the future, so your monthly savings will get better with age too!

Photo of a bathtub with a white towel draped over the edge featuring a low flow faucet.

A Home That Hugs You Back

Beyond the savings, there’s something magical about living in an eco-friendly home. It’s like it breathes along with you, offering cleaner air, a quieter, more serene environment, and that just-right feeling all year round. And when the time comes to sell, these green upgrades can translate into a higher appraisal, more home equity, and make your home stand out to potential buyers.

Kickstarting Your Green Savings

Feeling inspired? Starting your eco-friendly journey doesn’t have to be an all-or-nothing leap. Begin with a few small changes and watch how they start to add up. Every step toward sustainability brings you closer to a home that is more comfortable, cost-effective, and appealing to future buyers.

Photo of a home interior with energy efficient windows recently installed.

Real Stories, Real Impact

At Milend, we’ve seen the incredible difference eco-friendly upgrades can make. Take the Nguyens, whose new, efficient windows, caulk and insulation, and LED lighting made their home the coziest and brightest spot on the block. The Department of Energy says the average homeowner to make these two upgrades will save $690 in energy costs each year! Imagine what’s possible for your home and budget if you save 40% on your energy bills.

Let’s Do This, Together!

Sustainability is already a part of our daily lives. It’s about making thoughtful choices that benefit our wallets, our health, and our future.

If you’re inspired to make your home more sustainable and want to learn more about eco-friendly upgrades, sign up for our newsletter. You’ll receive the latest tips, success stories, and insights to help you navigate your eco-friendly and budget-friendly home improvement journey.

Together, we can make our homes work better for the way we live, our wallets, our health, and build a future of financial freedom for ourselves and our loved ones. Let us know in the comments or use the contact page to tell us how we can support your home financing journey.

Let’s Grow Together

As we navigate the spring market and beyond, let’s remember the values that bind us: trust, commitment, personal growth, and the importance of home. If you’re pondering your next move or seeking guidance in the ever-changing real estate landscape, reach out. Together, we can explore your options, prepare for the future, and turn the dream of homeownership into reality.

Stay tuned for more insights, and don’t hesitate to join our community for updates, tips, and stories that celebrate our journeys home, one step at a time.

Spring Market Preview: What to Expect in Real Estate
Read more...
Understanding Closing Costs: A Homebuyer’s Guide
Read more...

Unleash the Full Potential of Your Backyard

Unleash the Full Potential of Your Backyard 1920 1273 Your Loan Officer for Life

As the warm sunshine beckons, it’s time to unlock the hidden treasures of your backyard and transform it into a breathtaking oasis. With a little creativity and planning, you can create the outdoor space of your dreams that will have you embracing the beauty of summer like never before. Get ready to immerse yourself in a world of endless possibilities as we guide you through the steps of designing and crafting a backyard sanctuary that will make your neighbors green with envy. Let’s embark on this exciting journey together and elevate your outdoor living experience to new heights!

Define Your Vision: Creating a Blueprint for Success

Before diving into the world of backyard makeovers, it’s essential to define your vision. Close your eyes and envision your dream outdoor space. What features and elements would make it a sanctuary for relaxation and entertainment? Think about your lifestyle, preferences, and how you envision using the space. Consider aspects like seating areas, dining zones, a fire pit, a swimming pool, a lush garden, or a cozy reading nook. Start sketching or create a mood board to solidify your vision and set the stage for your backyard transformation.

Landscaping and Hardscaping: Shaping Your Outdoor Canvas

To create a stunning backdrop for your dream backyard, landscaping and hardscaping play a pivotal role. Work with professionals or tap into your inner green thumb to design a landscape that complements your vision. Incorporate a variety of plants, flowers, and trees to add texture, color, and fragrance to your oasis. Integrate pathways, patios, or decks to define different areas and create seamless transitions. Consider adding water features like fountains or ponds for a touch of tranquility. The possibilities are endless when it comes to sculpting your outdoor canvas—let the journey begin!

Outdoor Living and Dining: Embrace Alfresco Luxury

Elevate your outdoor living experience by creating functional and stylish living and dining spaces. Choose comfortable and weather-resistant furniture that reflects your personal style. Design a cozy lounge area with plush seating, accent pillows, and throw blankets for those cool summer nights. Set up a dining zone complete with an elegant table, chairs, and ambient lighting for memorable al fresco meals with loved ones. Don’t forget to add shade solutions like umbrellas or pergolas to ensure comfort during sunny days.

Outdoor Kitchens and Grilling Stations: Unleash Your Inner Master Chef

Take your culinary adventures to the great outdoors by incorporating an outdoor kitchen or grilling station. Install a barbecue grill, a prep area, and ample counter space for food preparation. Consider adding a sink, a mini-fridge, or even a pizza oven to enhance the functionality and convenience of your outdoor cooking space. With an outdoor kitchen, you’ll be the ultimate master chef, serving up delicious meals with a side of fresh air and sunshine.

Lighting and Ambiance: Illuminating Nights, Creating Magic

Don’t let the sunset limit your enjoyment of your backyard haven. Introduce captivating lighting solutions to transform your outdoor space into an enchanting retreat after dark. Install ambient string lights to add a warm and inviting glow. Use path lights to guide your steps and highlight the beauty of your landscaping. Consider accent lighting for architectural features or focal points. With thoughtfully placed lighting, you’ll be able to extend your outdoor gatherings well into the night, creating an atmosphere of magic and serenity.

Entertainment and Recreation: Fun and Play for All Ages

Make your backyard the ultimate entertainment hub by incorporating elements that cater to all ages. Create a dedicated play area for children with swings, a sandbox, or a playhouse. Set up a sports court for friendly competitions or a putting green for golf enthusiasts. Install an outdoor theater system for movie nights under the stars. The options are limitless, and your backyard can become a place where fun, laughter, and unforgettable memories are made.

Financing Your Dream Backyard

Ready to turn your dream backyard into a reality but concerned about financing? Explore the financing options available to you. Consider a home equity loan or a cash-out refinance to fund your project. Speak with the experts at Milend, Inc to learn more about financing solutions tailored to your needs. With the right financial support, you can bring your backyard vision to life and enjoy the outdoor oasis you’ve always dreamed of.


Conclusion

Your backyard is a blank canvas awaiting your personal touch and imaginative ideas. By following these steps, you’ll create a backyard space that’s both stunning and functional. Embrace the warm embrace of summer, surround yourself with nature’s beauty, and design an outdoor sanctuary that reflects your unique style and desires. Your dream backyard is just a few steps away—let the journey begin!

Your Ultimate Winter Home Preparation Guide
Read more...
A Financial Blueprint for a Successful Mortgage Application
Read more...